Sunday, January 12, 2014

Pajama Refashion - Cowl Neck Sweater

Inspired by this tutorial I decided to try my hand at making my own DIY V-neck-with-cowl-collar. The original looks pretty sharp 'cause her cowl neck fabric matches the shirt. I assume she made the shirt and had left-over fabric. I don't have the resources on-hand to be that matchy-matchy. I'm working with what I've got laying around.

I've had this green v-neck sweater in my "refashions to do" bin for a while. It doesn't fit me anymore. Seeing how tightly it stretches across my dress form should inspire me to get to the gym more often. But it doesn't.
This used to look so cute on me...
Then - I needed cowl-neck fabric. Back to the bin and I pulled out these old pajama bottoms.
Soft, decent color. You'll do.
I need the entire leg to wrap around the neck-line. So it was just a big chop.
Just a leg.

Then, I got to pinning. I folded in 3 pleats. Let me jump ahead and say it wasn't enough. I like this project and would do it again, and will use more pleats next time.

Three pleats -not enough.
 Then, I sewed that in place. It was a bit difficult to get those pleated areas through -- it was pretty thick. The, back onto the dress form to wrap the rest of the fabric around the neck and pin in place.


Once sewed in place, I was left with a weird end. I consulted the original tutorial and tried my best to mimic it, but this was a bit tricky. I ended up putting in behind the original portion and sewing it down. But, it was lumpy. I had to undo those stitches and try again.
Not quite right...
Better.

At this point, I tried it on myself. Even though the sweater was too tight for me, overall it was pretty cute. I like to wear infinity scarves a lot, so this was like having one built in. I decided not to do any buttons because without the pleats, they just didn't look right.

Overall, good project. I'd do it again. And if you're looking for a 30 minute project, give it a shot.

More pics...


Out of the Attic

My sister-in-law (who is also one of my best friends from high school) recently gave me a box of clothes that belonged to her mother. Her mom had attended Fashion Institute of Technology, though when I knew her she was an English teacher by profession. Several dresses in the box were made by her, probably in the 70's. I knew that a few would become great refashions. I started with this one - I LOVE the print of this fabric.
Great print - just needs a few quick updates.
 However, the long sleeves and length needed to go. This became a super-quick refashion. Also, it was a bonus that it fit through the bust, waist and hips.

I used my seam ripper to unpick the sleeves -- took about 10 minutes.
Bye sleeves. I hope to use you in another project some day.
Then, I just pinned all around and sewed those raw edges down.

Next, all that was left was trimming off the bottom of the dress. I did that on my dress form and followed the line of the pattern. Luckily, it was even. And while I usually don't like hemming, I knew I had to do it. So I followed it over twice, pressing and pinning as I went and then ran it through the machine. And done!

Cut, but not hemmed.

From the back.

The finished product. I'm practicing the pose I see other bloggers doing. It's weird.

Post-ponytail. I look a mess, but the dress is cute.

After - Fabulous for today.
Before - Fabulous for it's day.

Thursday, July 4, 2013

Scrappy Skirt (for kids) - In About an Hour

My 5 year old niece asked me to make her a skirt. I had a good amount of fabric to choose from, but she went for this which was really not much more than a scrap:


Not quite enough for a skirt -- even for a 5 year old.

But, it had kitties on it so she was not changing her mind.

I reached for my trusty white sheet (which has served me well providing practice material for a skirt with a zipper, and as a pattern for my rounded collar shirt.)

I decided to do a paneled look skirt with a draw-string waist. To start, I cut the kitty fabric in half and cut the same sized pieces from the white sheet. Then, with right sides facing, I sewed the kitty fabric to the white fabric to create one long piece.

Right sides facing.


Now we have enough to make a skirt. I trimmed that bottom so it was all even.

I folded the top over twice and stitched it down to create a tube for my drawstring.

This drawstring requires 2 pulls -- one on each side. Here's the tutorial I based this on -- I've made these drawstring bags several times now and I love them. If you follow the tutorial above, you won't need my instructions below -- I did it her way and it was good, but I redid it because I wanted to move my drawstrings and need to improvise.


Once it's sewn, find the middle of the side -- this is where your drawstrings will come out. Snip a little hole in the fabric to thread your drawstring through. I used a satin ribbon and a large safety pin to thread it. Once that's done, snip a hole on the other side and do the same thing.

Thread the ribbon through the casing.


In one side, out the other. Repeat.


Now, you don't want those ribbons to get pulled back into the skirt, so you should tie the ends off. I added a large wooden bead 'cause I happen to have them in my draw o' stuff. So, the skirt is now adjustable in size around the waist -- just pull the ribbons and there you go.

Oh yeah -- I hemmed the bottom and gave it a good press all around and here's my cute scrappy skirt for my niece -- I'll try to get a pic of her actually wearing it next week:

It's Kitty Cute!


Sunday, June 16, 2013

Rick-Rack Paddy Wack

There's not much to say about this one -- it was too easy. It's your basic skirt to dress refashion, but in this case, the waist of the skirt wasn't elastic, so I had to open it up a bit to make it fit around my chest.

Here's the skirt as purchased:

$6.99 -- not too bad, it's a good quality Talbots skirt.

One side has a zipper, so I left that partially unzipped, and on this side, I opened the seam to match. This gave me the breathing room I needed.

I tucked in the sides a bit at a angle, otherwise, the top would go straight across -- that would be weird. The only matching material I had for straps was this rick rack so it would have to do for now. Not my favorite, but I wanted to wear this dress right away.

I sewed up those hems around what are now the arm holes and was all set.


I couldn't find my camera so had to settle for an iPod photo. I'll do better next time.
Before and After - easy-peasy.

Monday, June 3, 2013

Fun with shoes! Yep, refashioned shoes.

I'm not a big shoe girl. I stick with the basics, black heels, brown heels and none of these deviate too far from the penny loafer style I grew up wearing.

Last year, I saw that someone posted about painting old shoes to make them new again. So I gave it a shot. I started with these fine, but typical for me, shoes.

Not bad, but how many pairs of black heeled-loafers do I need?


 I didn't go in with a plan, but I had some pale pink spray paint that I could use. I covered the heels and the buckle with newspaper to keep them black.
Taped and papered.


  And I sprayed pained them. This is how they looked:


 Not bad, but I went back and pained the heels and the buckle too.

Painted and ready to go.


However...I wore them once and it was a disaster. The paint got all crackly where the shoes bend as I walk -- across the top part, highly visible.

Not the look I'm going for.
So, back to the refashion drawing board - I decided to decoupage with fabric. I mean, they couldn't get worse, right? I used newspaper to make a pattern for each section of my shoe -- one for each side, plus the top. I used the paper pattern to cut out the fabric and I used Mod Podge to glue the fabric to my shoe.
Newspaper pattern.


Mod Podge and a foam brush.


There's a seam in the back, it's hardly visible.
I left the heels pink just for fun, but I used nail polish to color the buckle, 'cause the pink didn't really work. Now I have a new pair of non-black/non-brown shoes. I have worn these twice with no problems -- no fraying, no cracking, etc. I will definitely do this again.


Sunday, June 2, 2013

When a Refashion Fails

Not every refashion is a win. The bummer of it is, sometimes you don't even realize until the very end, after you've spent nearly 3 hours in your un-air-conditioned sewing room where it's 87 degrees and all along you think you've got a winner on your dress form. Here's the story:


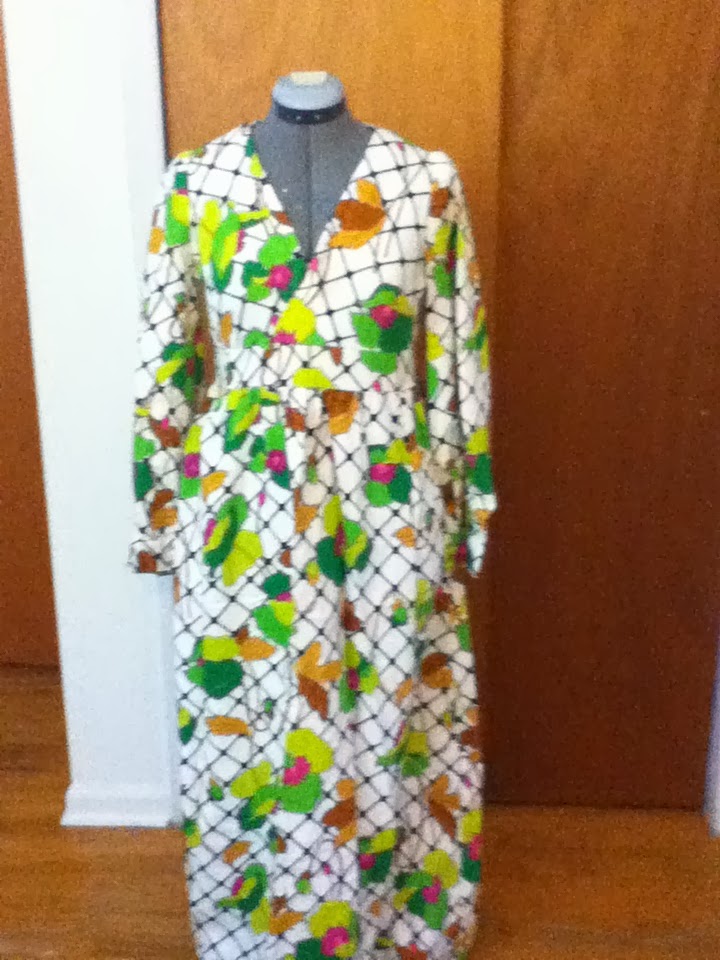
At a glance, you might think this was a win...it's not.

I bought this plan blue dress several months ago and set it aside after taking a few inches off the bottom. It has a matching belt, but I'm not sure where I put it.
Meh. I dig the neckline though.
Because it's so hot, I figured those sleeves had to go. I also wanted to do something interesting with the back, maybe a conservative racer-back, just slightly cut-in, so I chopped away and then turned the dress inside out on my dress form. That's when I saw this:
What's this I see around the neckline? Something I can use as a round collar, I think.
I dig that look of dress or tops with a round collar. So I decided that's what I'd do with this piece of materials. I started to take it off using a seam ripper but that was taking too long so I just yanked it off.

Don't worry, this will be on the inside.

Next, I cleaned up those frayed edged by rehemming all along my new collar. Then, I pinned it on the wrong side of the dress, around the neck line. That way, when flipped to the correct side, those seams would be invisible. (See...even with a fail, I learn or practice a new trick.)


Then, I just sewed that in place and turned the dress right-side out and back on the dress form. My technique of ripping left some frayed edges visible, so I pinned the collar in such a way so that my top-stitching would hide that.
Unsightly frayed edges.


Top-stitched and back on the form.

Nearly finished...or so I thought.

Now, when I see it in pictures, it's totally obvious that the arm holes are too big. And the dress needs to be taken in on the sides. Why I didn't see this from the get-go, I'm not sure. See, when I cut off the sleeves I was a bit too ambitious. This left the sides of the dress gaping. You can see that in the picture above. I didn't see, and I thought, "This dress is adorable!" So I put it on. There are no pictures of this because I was a sweaty mess.  But I pinned where the dress needed to be taken in and tried to tighten up the sleeve hole.

ALSO, while the neckline looks cute on the dress form, it didn't work in reality. The "straps" were too wide. The collar should extend past the sleeve part. So, back to the machine, I narrowed the sleeve area so the collar went past the edge.


Narrower arms so the collar extends past.

The arm holes are still such that I think I run the risk of -- side-boob!! EWWWW.
No one wants to see side-boob. Well, I don't.
I also don't like the way it hangs on me. So that's that. I didn't throw it out though. I'm not 100% giving up on this, but I don't think it will serve it's final days as a dress. Maybe a casual top. We'll see.