Tuesday, June 12, 2018

Reupholstered Footstool

I bought this footstool at a garage sale for a mere $3.
The hole cost extra. 

It's well-loved. 

Isn't it lovely? I knew right away that I could easily reupholster it, and probably paint the wood a darker color to match my other furniture. Nearly a year later, I still hadn’t done it. But that changed this weekend!

The underside. Just remove the 4 screws holding the cushion in place. 
As I started taking the bolts off to release the cushion (using just an Allen wrench) I realized I would probably need a staple gun for this project. I don’t have one and I knew if I set this aside while I found one to borrow, it would never get done. Glue gun to the rescue! (Is there anything a glue gun can’t solve?) 

Taking off the old fabric involved taking out the existing staples – I used a flathead screwdriver and pliers. Not hard, but it was time consuming. 


Months ago, I bought some great orange and white geometric print fabric and luckily, I still like it. (Full disclosure - I spent $23 on this fabric BUT I will get the footstool and covers for 2 sofa pillows with it.)  

After that, I used the old fabric to measure my new fabric, cut it out and folded it over the cushion. I wrapped it like a present, using glue along the edges and pulling it tight and smooth across the top. Make sure you center the fabric as you’d like it to appear. I didn’t do this but got lucky that it looked good. Something to keep in mind next time. Then just reattach the cushion and you're done. 

I didn’t paint it yet as it was raining and I thought a warm dry day would be better. But when I do, it will be simple to take the cushion off, paint the wood and put it back together again.

Relaxing after a not-so-hard project. 

Up next – matching sofa cushions!


Thursday, February 8, 2018

No Sew Halter

Maybe I'm late to the game with this one, but really wanted to share. Enjoy this "refashion" of turning a tank top into a halter.

I'm Going to Save You $38 on this Scarf!

A woman I regularly sew for introduced me to infinity scarves with a zipper pocket. The pocket can be used to hold your phone, ID, mittens and hat, generally anything small that you might want to carry around without having to lug a purse with you. She's a senior caretaker and needs to have her hands free so I've also added pockets to her scrub pants and tops (that's another post.)

I looked online to see examples of these scarves and holy cow - they can cost up to $40!  Most of us already have infinity scarves (and if you don't, they are the EASIEST THING TO MAKE for cheap.)

She brought me her two favorite scarves and I added to each a zipper and a two straight lines of stitches to make a pocket and done - for less than $2.00 each! 

A lot of novices sewers aren't keep on working with zippers, but get over it. There are tons of tutorials on Youtube to help you out and once you get a few done it's not as daunting as you think. I'm no expert and didn't have internet at the retirement home where I volunteer so I was winging it, but I still managed.

Here's what I did.


Started with a regular infinity scarf and cut a zipper length along the seam.
Infinity scarf with zipper

Infinity scarf with zipper
My zipper was too long, so I cut it and just sewed across the bottom to secure it. Don't sweat the small stuff.  


Infinity scarf with zipper

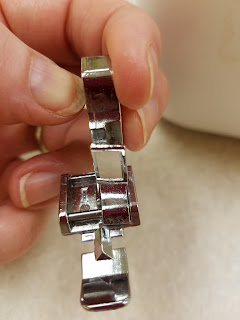
First things first - a zipper foot helps. I doubt it's something you MUST use for zippers but it helps. Most sewing machines come with some basic footers and this is the zipper foot.

zipper foot
Zipper foot. The more you know...

zipper foot
The zipper foot lets you get right up close to the zipper and easily slides over so you can do both sides of the zipper. See that little cut out area? That's where the needle does it's magic. (Ignore my gardening finger nails...) 


This is where I just started winging it, so if you're already good with zippers do it the way you know how. I turned the scarf inside out and pinned the zipper in place in the area I had cut out. Full disclosure - I did this wrong the first time and ended up sewing the zipper in such a way that I closed the seam all together with the zipper just hanging out all useless. So I had to start over.

I decided I didn't need to turn it inside out. So here's what I did that worked out correctly. I lined up the one side of the open seam along the zipper and sewed it.

Sew simple! Ha - sewing puns. 
When you get to the zipper pull, leave the needle in the fabric, but lift the contraption that holds it all in place so you can move the pull down out of your way. Then finish up that side. Turn the scarf so you can sew across the top, making a right angle. Then sew back down the other side. You're basically sewing a box.


Now you just need to sew a straight line at the end of each side of the zipper to make your pocket, otherwise the stuff you put in there will just get lost. You can make your pocket as wide as you want, I went about 2 inches to either side of the zipper.

And then you're done! A $40 scarf for the cost of a zipper!


Infinity scarf with zipper


Sunday, July 9, 2017

Don't Throw It Out - It's Fixable!

This isn't so much a refashion as it is a lesson in fixing something that is "ruined" before you throw it out and buy new. 

I bought this dress (new) a couple of years ago. Maybe it was $20.00 and I love it. I usually wear it with a colorful belt. Sadly, the side seam ripped in a way that wasn't easy to fix. 


I tried to fix this with iron-on seam tape. You can see it here. It didn't work.
Shredded seam. 
 But - I did have this fantastic fabric in my collection. The color match was perfect. I would use it to create a block at the bottom of the dress serving 2 purposes - cover the ripped the seam AND add a about an inch of length, which I felt the dress needed when wearing to work.


I don't think there is any right way to do this. It's pretty straight forward.  You could just sew it on anyway you know how. I decided to be more precise for a change and actually measured it, folded it so it would have a bit more weight and look nicer.

Precision. It's a nice change for me. 

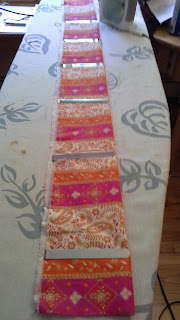
 With my strip of fabric measured, I ironed it so it would be crisp and lay flat when I sewed it.


I pinned it in place and sewed it all around.

And it turned out great. The only bummer? I can't wear a colorful belt with it any longer. I wear it without a belt and it's fine.


Sunday, January 15, 2017

Why I buy secondhand clothes

When I started this blog, it was to support my mission of not buying any new clothing for a year (where "new" meant new to me - new with tags previously owned were okay.) And I did it. I may or may not have saved money, but I suspect I did. I stopped buying things based on "So cute! I need this," and put more thought into what I actually needed. And I definitely improved my sewing skills.

Then I pretty much fell back into buying new. I mostly stuck to discount stores -- TJMax, Marshall's, etc, but very much new. I would still hit the occasional thrift store, but it was no longer a priority.

Then I cleaned out my closet in December and discovered 4 pairs of black pants. They all fit differently. I accumulated them over the years in search of the perfect fit -- and never found it. I spent some time tailoring two of them and will likely donate the other two to Dress for Success.

So this year, I'm back to used/previously owned only. My focus will be less on refashioning and more on doing more with less. I have become a huge fan of online consignment shopping -- specifically ThredUp.com. There is another one I recently discovered but haven't tried yet called Swap.com. These sites make buying previously owned easy (almost too easy if you're prone to over-shopping.) And they also allow you to consign your own gently used items which I might try soon. (ThredUp also has a charitable arm of their business, you can read more about that on their site.)

You can search all the reason why buying secondhand clothing is beneficial -- you'll pay less for quality items, it's better for the environment, and if you shop at Goodwill or other charitable thrift stores you're contributing to their overall cause, and if you shop at your local thrift stores, you're supporting local businesses. But making the decision to forgo brand new clothing is a personal one. Luckily, the "stigma" of shopping secondhand has been diminishing over the years.

So in an effort to further diminish that stigma, I'm happy to share with you my recent used clothing purchases.

ThredUp.com -- I needed to add some better basics to my work wardrobe and spent about $104.00 total for all of the following:

1. Ann Taylor Loft Brocade Pants -- NEW WITH TAGS (NWT) - love them, they aren't tapered on the bottom, I'm just a terrible photographer. The second pic is to show the color and detail.


2. Banana Republic Straight Skirt (NWT) - Perfect for work. Love this skirt.


3. J Crew skirt - (Used) My new FAVORITE skirt. The other day when I wore this a woman came up to me and said "You look exquisite." I haven't taken it off since.) It's cream with light blue and gold pattern - I know it's hard to tell hopefully the second picture helps.

4. J Crew (NWT) blue top, thinking this will be great for work.


 5. Ann Taylor (NWT) green top with gold neckline accent. Tailored this already -- it was too big so I sewed a single seam up the back, taking it in an inch. Wore this for Christmas with the brocade pants above.


6. JCrew (used) - And finally, a casual top the reminds me of one I permanently borrowed (read: stole) from a dear friend in Baltimore back in the day. Loved it then, love it now.

These items, combined with the staples already in my wardrobe allowed me to spruce up my work clothes options for not a lot of money. I also hit the local thrift store yesterday and about 2 items from the $1.00 rack -- those will be refashion projects that I'll share when I tackle them.

I will try to stay more active this year with more refashions, and if you have ideas or questions about how you can do it -- even if you can't sew - let me know!

Saturday, July 2, 2016

Worn Out T-Shirt to Halter Top

There are many tutorials out on the interwebs about turning a regular t-shirt into a halter top. It's easy and quick.

I started with this worn out tshirt that Charles was going to throw out. NOTE: THROW IT OUT? Excuse me, but I bought this for him in Hawaii when we first started dating. Has he no sense of nostalgia? I saved it from the garbage bin and put it in my "projects" box in the sewing room.


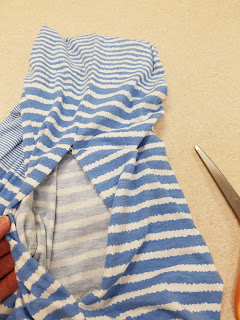
I don't remember which tutorial I followed but there are lots of them out there. It's good to use chalk to mark your cut lines. And know that once you cut, this is what the back is going to look like. Yikes.


I needed to put seam up the back to pull that together. (Yes, my dress form wears a slip, don't ask...)


The seam in the back helped make the front hang smoother as well. All set for the beach.

From maxi dress to fun summer top

I popped into a consignment shop that was new to me and discovered this dress for more than I would normally spend (about $21) but I figured I'd get a cute summer top and a skirt for it. And I could probably do something with the mammoth sleeves as well.


 The first thing I did was get rid of the sleeves, but kept the round yellow neck-line. I love round necklines. (I take terrible photos, sorry.)


 Then I stitched all around to make sure there were no raw edges from cutting.


 Next, I pinned the sides and sewed up to make it fit me better and close up the arm hole a bit. No one wants side boob.


 I could have been more careful with the next part -- where I chopped off the bottom half of the dress. In this picture, I've already cut out the bottom yellow hem, which I needed to finish off the bottom hem of my new shirt. I plan to use this piece to make a simple summer skirt.

So, I took the bottom piece and sewed it to the top. You need to put both pieces right sides together and sew it. I didn't get pics, sorry about that. But here it is inside out after I sewed it.

And here is the finished product. I actually work this to work yesterday with some black ankle-length pants and did get some compliments, so I'd say it was a success.


BEFORE AND AFTER